quilterpenny

My Photo
Name:
Location: Southern California, United States

Monday, October 30, 2006

Happy Halloween!


Late last night even as the owls were hooting, the cats were howling, and the spiders were crawling, my tame animals and I were safely tucked away busily getting ready for the throngs of children who ring our doorbell and shout “Trick or Treat” every year.

Or something.

The truth is that since we are the only house on a busy street, well, Halloween is just like any other night of the year – dark and quiet on the outside, bustling with activity on the inside.

And this night was no different.

Although we weren’t getting ready for kids to Trick or Treat, we were jumping for joy because CJ from the video shop called and said that the Step-by-Step DVDs would be ready to pick up on Thursday. Yeah!

We were posting the latest pictures of the Turkey for the Troops fabric postcards, which now number 93. Check ‘em out:

http://www.fabric-postcards.com/turkeypostcards.shtml

We were putting the finishing touches on the monthly newsletter and the package of 10 free patterns, which will be posted Nov. 1.

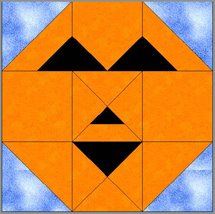
And we were designing a 9 patch pumpkin quilt block. And that was the most exciting event of the evening.

We were so excited, we decided to share the pattern with you – for free!

It’s posted on the Free Quilt Patterns page on the website:

http://www.how-to-quilt.com/patterns/free-quilt-patterns.shtml

Or you can go directly to the pdf file:

http://www.how-to-quilt.com/patterns/9patchpumpkin.pdf

This is an original design, made from squares, triangles, and a baseball home plate. (‘Tis the season – or the end of baseball season anyway.) You’ll see what I mean when you look at the templates for the pattern.

This should be a pretty easy pattern to put together. For the beginning quilters among us, just remember to start by sewing the pieces in each of the 9 patches together, and then sew the patches together, one row at a time. Once you have the 3 rows done, then, sew the rows together. Sound confusing? It’s not really. Just take it one step at a time. Hmmm - - - maybe the pumpkin block is a topic for another Step-by-Step Guide.

Anyway, Happy Halloween! May the Great Pumpkin visit your Pumpkin Patch in Peace J

Happy Quilting!

Penny Halgren

www.How-to-Quilt.com

Inspiration and Education for Beginning Quilters

www.Fabric-Postcards.com

Quilt Greetings Across the Miles

www.Rag-Quilt-Instructions.com

Fast, Fun and Funky Quilts

P.S. Now that we have added a packet of 10 patterns to the newsletter each month, you may wish to consider getting a printed version of the newsletter each month. No, you won’t be getting 60+ pages of quilt patterns in the mail, but you will get the newsletter printed out and a disc with the patterns on it. Plus you get printed copies of all of the newsletters for 2006.

http://www.how-to-quilt.com/newsletter/printed.shtml

Sunday, October 15, 2006


Fun and Easy Rag Quilting

The first time I heard the term “Rag Quilting,” I though it had something to do with using big, long rags of fabric and somehow weaving them together to make a quilt.

Boy, was I wrong!

It turns out that rag quilting got its name from the ragged edges on the quilt. No doubt in my mind that this quilt design was created by a quilter as a variation of a Quilt as You Go kind of pattern – whether it was intentional or accidental is something only that quilter knows.

Wide seam allowances are common for rag quilting – usually at least 1.” So, if you would like each block to be an 8” square when finished, you should cut 10” squares of fabric and 7¾” batting or flannel.

To make a rag quilt, you take 2 squares of fabric (could be triangles or any other shape, but squares are most common), and a piece of batting for each block in your quilt. You could use a piece of flannel instead. The batting or flannel should be cut about 1¼” smaller than the squares of fabric.

Place one square of fabric right side down on your table. Place the piece of batting or flannel in the center of the fabric. And then place the other piece of fabric right side up on top of the batting. You now have a stack with 3 layers, and the right sides of the fabric are facing out.

Stitch through all of the layers, to secure them in place. Usually these squares are machine stitched, using a simple straight stitch, making an X through the square. To do that, you begin in one corner and stitch to the opposite corner. Take your square out of the machine, and repeat the process on the other corner. You could do some fancy quilting in each block if you would like.

Continue this layering and stitching for as many squares as you would like – depending on how large you would like your quilt to be.

Once you have all of your squares/blocks stitched, it is time to begin to sew them together to make your quilt.

The process is the similar as if you were sewing blocks together to make a quilt top, with just a slight twist or two. Take two blocks and place them WRONG sides together. Stitch them together using a 1” seam allowance. Sew the seam along the entire edge of the fabric, and do not backstitch.

Sew the blocks in each row together. Now you have a bunch of rows of blocks with all of the seam allowances facing to one side (usually the front side).

Once that is done, open the seam allowances, and sew the rows together, continuing to place the WRONG sides of the fabric together, so your seam allowances will face the top (right side) of the quilt.

After all of your blocks are sewn together, clip the seam allowances – that is what makes the “ragged” edge, or fringe. Take a very sharp pair of scissors and cut about ½” into the seam allowance, making sure not to cut into the stitching. Make these slices about ¼” apart from each other. These slices are from the edge of the fabric toward the stitching that holds the seams together.

Once all of the seams are clipped, shake your quilt out to remove as many of the loose threads as possible, then wash the quilt and place it in the dryer. This will cause the clipped seam allowances to fringe even more. Be sure to clean the lint trap on your dryer.

And, now you’re done!

Read here for more Tips for Maiking Rag Quilts.

Discover a complete Guide for making a Rag Quilt in a Weekend!

Happy Quilting!

Penny Halgren

Penny is a quilter of more than 24 years who seeks to interest new quilters and provide them with the resources necessary to create beautiful quilts.

www.How-to-Quilt.com
Inspiration and Education for Beginning Quilters

www.Rag-Quilt-Instructions.com
Fast, Fun and Funky Quilts

www.Fabric-Postcards.com

Quilt Greetings Across the Miles


This article courtesy of http://www.How-to-Quilt.com.
You may freely reprint this article on your website or in your newsletter provided this courtesy notice and the author name and URL remain intact.

©2006, Penny Halgren