quilterpenny

My Photo
Name:
Location: Southern California, United States

Sunday, August 20, 2006

Fabric Postcard Photo Quilts

You may have seen or heard about postcard quilts. Quilters around the world are creating fabric postcards and sending them to their friends in the mail. Imagine how pleased you would be to receive one of these little handmade treasures from one of your quilting friends.

As with so many things quilted, everyone has a somewhat different idea of a postcard quilt. One form of traditional postcard quilt is a full-size quilt made up of 4” by 6” rectangles (postcard size patches) sewn in rows, and offset, like you would build a wall.

A different, yet still traditional form, is where the postcard shaped block is set like a block surrounded by sashing. This, too, is generally a full size quilt, and may have a central theme – travel, baby, college, etc.

Also popular are landscape postcard quilts, or small appliqué pieces that might be a replica of a picture postcard – a scene in a town, lighthouse, bouquet of flowers, etc. This style quilt might range in size from postcard size – 4” by 6” up to 12” by 18” or more.

Ideas for designs and sizes vary. Some quilters create a foundation by painting or dying fabric and then use quilting stitches, buttons or other notions to embellish their design. Others meticulously appliqué a scene that looks exactly like a picture postcard or creative design. In some cases, quilters create photo quilts by transferring a favorite photograph onto fabric and adding a border to complete the design.

It’s both easy and fun to make these little treasures, and then send them through the mail to your family and friends. Using just a home computer, scanner and printer, you can transfer a favorite photograph onto fabric, add a border and backing, finish the edges, and send it through the mail. You can include a personal greeting printed or hand written on the address side of the quilt postcard.

The US Post Office has size regulations for your finished fabric postcard to qualify for the postcard rate, or you can pay the full first class rate (39 cents) to mail your little quilt. A quick trip to your post office and a visit to the postal worker will help you decide how is best to mail your card.

While adding buttons, rickrack, netting, and other embellishments makes the quilt card fun, these may survive better inside an envelope. Although they may not have as much of an impact as seeing a fabric card stacked in your mail, opening an envelope to find a quilt postcard must be just as fun.

It’s not too late to start making these for your holiday greetings. Each one takes very little time, and if you make several at once, your efficiency will increase.

You can get more information about making postcard quilts at:

www.Fabric-Postcards.com


Happy Quilting!

Penny Halgren

www.How-to-Quilt.com
Inspiration and Education for Beginning Quilters

www.Rag-Quilt-Instructions.com
Fast, Fun and Funky Quilts

www.Fabric-Postcards.com
Quilt Greetings Across the Miles

Thursday, August 17, 2006

Robin's Nest DVD Update

Greetings,

The weekend passed, and Stephanie (my quilting daughter) and I made yet another attempt to convert the file into a real DVD. But to no avail. Twice it got stuck on 'verifying the media.'

So, bright and early Monday morning, CJ got the call. He admitted to much confusion about my problems, since he said that "it should be so easy." Man, I've heard that story so many times now, I know it by heart.

As we talked about what was going on, he suggested that I put a DVD into my DVD drive and see if it played. Guess what - pictures, no sound. I tried another one. Nothing at all - no pictures, no sound.

Time to shut off the computer and regroup.

Regrouping for me in this particular instance was to call my son, the engineer who built my computer.

After listening to my tale of woe, he declared that it was really time for me to just get a new computer.

I should have known. Both he and Stephanie have been complaining for years about how slow my machine is. But, I'm a quilter who uses a Singer Featherweight sewing machine from 1950-something. Why would I need a brand new computer?

After I thought about it, I realized that my computer was built before we thought about doing DVDs. Heck, it may have been built before DVDs! After all, my son added the DVD drive last year, just as a 'nice thing to do,' not dreaming I would really come to rely on it.

So, he ordered the computer, and it is on its way.

In the meantime, I'm using this time to collect frames of video for pictures in the book, and then writing the book to go along with the DVD.

Greetings,

The weekend passed, and Stephanie (my quilting daughter) and I made yet another attempt to convert the file into a real DVD. But to no avail. Twice it got stuck on 'verifying the media.'

So, bright and early Monday morning, CJ got the call. He admitted to much confusion about my problems, since he said that "it should be so easy." Man, I've heard that story so many times now, I know it by heart.

As we talked about what was going on, he suggested that I put a DVD into my DVD drive and see if it played. Guess what - pictures, no sound. I tried another one. Nothing at all.

Time to shut off the computer and regroup.

Regrouping for me in this particular instance was to call my son, the engineer who built my computer.

After listening to my tale of woe, he declared that it was really time for me to just get a new computer.

I should have known. Both he and Stephanie have been complaining for years about how slow my machine is. But, I'm a quilter who uses a Singer Featherweight sewing machine from 1950-something. Why would I need a brand new computer?

After I thought about it, I realized that my computer was built before we thought about doing DVDs. Heck, it may have been built before DVDs! After all, my son added the DVD drive last year, just as a 'nice thing to do,' not dreaming I would really come to rely on it.

So, he ordered the computer, and it is on its way.

In the meantime, I'm using this time to collect frames of video for pictures in the book, and then writing the book to go along with the DVD.

So, while we have a moment, I'll explain what I have discovered about making a DVD. Who knows whether this is all really true. It's just what I have pieced together from my experience and asking a bunch of questions.

The Video Story Continues

In my previous blog, I described the process up to getting the AVI files.

I really have not much of a clue exactly what an AVI file is. What I know is that it is huge! My little 4 GB file exploded into a 26 GB file - and that is just for one of the DVDs that represents 1 1/2 hours of video.

Once in that format, I needed to convert it into an mpeg file - so you could watch it on either your TV or computer. No problem!

Oh, but first, I need to add a menu - so you can jump around on the DVD and look at just the parts you want.

So, I need some software to do that. Oh, now that was exciting, too!

I called around to different video places. I had already tried to find people online to help - to no avail.

Three phone calls, and I found CJ. What a guy! He has walked me through this, and has been incredibly patient.

The first thing he suggested was an Adobe program that would insert the Menu and Chapters, and then compress the file and burn it to a DVD. Sounded great!

I found the program, downloaded the trial version, and tried to install it. Got an error message. Tried again. Got the same error message. No go.

The next day, I called CJ again. He suggested that my computer didn't have Service Pack 2. Hmmm - I thought it did. Oh well, I'll try again. But first, I checked. Using the Microsoft website, I confirmed that I did have SP2 installed. Something else was wrong.

So, I got on the phone to Adobe. I got ahold of a very helpful technician who determined that my problem was that my computer had an AMD processor, and their software works only with Intel. So much for that program.

Next day, back on the phone to CJ. He told me that he had an AMD processor on his computer (at least I'm not alone here), and that he had an earlier version of the program that might work for me. Niiice.

Ran over to his shop, bought the program, took it home and loaded it up. Sure enough, it installed, I opened up my project and started to rock and roll.

This program works with Photoshop, so I could create a cute little menu and then import it to my project. That done, I added buttons and chapters, and was ready to build a DVD.

And that's were I am now. Building a DVD. Well, temporarily stopped, becuase this computer, as reliable as it has been, would prefer to take a rest and not make a movie. It's great for still pictures, but movies - well, that's apparently too advanced. Hmmm. Not really, maybe it is just that movies take up too much space.

So, the new computer should arrive next week, and we'll be off to the movies once more. I anticipate smooth sailing from there on. And with good fortune and good weather, the DVDs should be ready by September. Only a few weeks past my original estimate.

In the meantime, Stephanie and I have created 3 great packages of goodies for you - depending on what you want or need for your quiltmaking project. And as I gather everything and get it ready to go, I'm getting more excited. Can't wait to show it to you!

And now it's time to format some more photographs for the book, and get writing!

Happy Quilting!

Penny Halgren
www.How-to-Quilt.com
Inspiration and Education for Beginning Quilters

www.Rag-Quilt-Instructions.com

Fast, Fun and Funky Quilts

www.Fabric-Postcards.com
Quilt Greetings Across the Miles

Sunday, August 13, 2006

Robin's Nest DVD Saga


Greetings Quilters!

So many of you sent emails encouraging me with the Robin's Nest DVD project that I have decided to keep you updated on the progress via this blog.

And, as a matter of education, to also divulge all of the challenges along the way. Education in that I hope you will avoid some of the mistakes I have made. And, if any of you have insights that will shortcut my learning curve - pass them on!

Last Friday, I was hopeful that I would be able to transform my movie project file into a movie on a DVD that would be ready for duplication.

Alas, that was not to be.

I made another attempt on Saturday, and got a little further along the way. The program transformed the project, and got stuck on verifying the media. I guess that means that it couldn't find the DVD disc or disc drive. Before it stopped, a box opened asking what I wanted to have happen on that drive, and I clicked it shut (aka Cancel), since none of the options seemed right.

After some thought, tonight I will tell it to open a file when it gets to that point. Who knows, maybe that will make a difference! I'll report in tomorrow.

In the meantime....

Some History

In the June survey a lot of you said that you would like to see a step-by-step, from start to finish, DVD. So, I decided to take the plunge and do it!

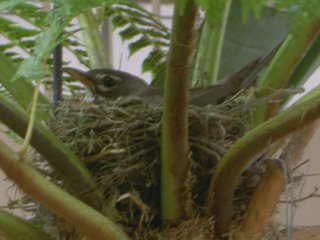
A little robin had been nesting in a tree fern outside the window at my office, and just watching her inspired a quilt block. Once the quilt block was created, it was just a matter of gathering a camera and making a quilt.

Sounds so easy, right?

The quilt part was easy. I fired up my EQ5 program, and drew up a block, and then a small wall hanging - just four 9" blocks, some sashing and some borders. I wanted to make this an easy project for beginning quilters; and expandable for those who want to make something larger or more complicated.

Then I rounded up a camera. Hmmm. Now the first challenge. How to hold the camera and sew at the same time. Seems pretty impossible.

As I looked around my house, I discovered that I had possession of some old camera equipment that my dad didn't want to move to their new house. Among the treasures were a couple of tripods - one tabletop one, and one stand-on-the-floor tripod. Now I was set.

And the filming began. I decided that it would be "just in my house" - no fancy spots, no studio, just in my sewing areas. So, the lighting isn't perfect; but you can see what you need to see.

Starting and stopping as each short step was completed or when I decided it was time to change a camera angle, filming progressed. Day and night.

I found a halogen camera light, and sewed at night using that while filming. Then I realized that it cast a kind of pink glow. So much for the light at night. I finally discovered that during the day in the south part of my house with as much natural light as I could gather was the best.

Then limited to day filming, I spent most of Saturdays and Sundays filming and sewing, and many early mornings during the week.

As sections of filming were complete, I transferred the videos onto my computer into Windows Movie Maker. People told me that was a great program for editing movies, and it would convert them into the right format for DVDs, no problem. hmmm

I wish I could say now that it was that easy.

The first thing I learned was that it would have been better if I had used a series of video tapes, instead of using one tape and shooting over previous pictures. Minor lesson, though important.

Using Windows Movie Maker


As technology goes, using Windows Movie Maker to edit the video clips was very easy. After some experimenting, I discovered that I could slow it way down so I could cut out parts where I had stopped sewing and hadn't turned off the camera yet.

Not knowing any better, I just kept adding video clips onto the "project." I was amazed at how long this video was becoming - 4 hours, 5 hours, 6 hours. Then I got a warning! The program told me that 6 hours was probably about the maximum it should be.

OK - that works. When I got to the end of a section, I started a new "project." When I finished that stage of editing I had 2 project files - one 6 hours long, the other 2 hours long.

Then I merrily called my favorite audio/video CD duplicator place. I told them what I had, and asked if they could convert it into discs that could be played on computer or TV and add a Menu and Chapters. "Oh, yeah. No problem. Bring it in."

The only thing was that only 1 1/2 - 2 hours of video could go onto each DVD. But all I needed to do was write down the times for the end of each Chapter point and DVD. Easy.

A couple of days later, with timeline and DVDs in hand, I showed up at the shop, and conferred with the engineer. Sounded like everything was set, and I would have my copies in 2 weeks. He would let me know in a couple of days whether they needed anything else.

Well, a week later, I called them. Guess what! They couldn't open the file(s). They don't have Windows Movie Maker, and didn't have a clue what needed to be done. They did know that I really needed an AVI file format for them to work with.

More about AVI files later.


Happy Quilting!

Penny Halgren

http://www.How-to-Quilt.com
Inspiration and Education for Beginning Quilters

http://www.Rag-Quilt-Instructions.com
Fast, Fun and Funky Quilts


Sunday, August 06, 2006

A Quilter's Journey - My First Quilt


Greetings, Quilters-

Come along on my Quilting Journey. This excursion began some 25 years ago, and will continue well into the future.

Along the way, you will see many of the quilts I have made and hear the stories behind them. I'll reveal the inside secrets of many of these works of art - the quilting mistakes I made that led to the outcome, my thoughts as I was making them, and sometimes you will see who received these quilts.

Before we start, I will share that the biggest mistake I have made is in not keeping good pictures of each and every one of my quilts. I have given many away, and have no record of them. Two of my favorites were stolen with no pictures.

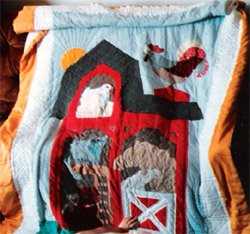
You are looking at the lone picture I have of this, my first, quilt. Cropped off of this picture is my mostly-naked daughter lying on the bottom of the quilt. She didn't like to wear clothes much - now she can't get enough clothes. Before I began writing tonight, I ransacked my house to find the quilt so I could take a picture of the whole, faded quilt. I hope Stephanie took it home when she was here at Christmas, or remembers where I stashed it safely away, along with the one I made for her brother. (It's too late to call Texas tonight- she surely will be in bed and not caring one hoot about that quilt.)

One thing I have done right is sign my quilts - first name and last name, and the year it was completed. A nice label would have been better, but sometimes by the time I finish a quilt, it's all I can do to sign my name with a permanent marker and get it on its way.

Like many quilters, many of my quilts have been made for other people. Lots of babies, and lots of teachers. After our second year at my kids' elementary school, I swear that the teachers fought to get my kids in their class, because they knew there would be a quilt at the end of the year. None were disappointed, and my kids got the best education going. You will see most of those quilts. Some were as amazing as the teachers!

And kids is where my quilting began.

As I was pregnant with my daughter, Stephanie, in 1981, my mother-in-law said she wanted to buy a quilt for the baby. All I had to do was find the one I wanted. Sounded easy. Then I began looking. I had never known about quilts before. I had done some needlepoint and rug-making, but knew nothing about quilting.

I searched unsuccessfully for a quilt to purchase. I wandered into a fabric store, started looking at quilt patterns, and found one I liked. Since I was blissfully ignorant, I knew not what I was getting into when I bought the pattern. It was an applique with mother and baby animals - horses, cats, dogs, and chickens, with a rooster crowing on atop the barn. Looked nice, and perfect for a new human mom and her baby.

Pattern and fabric in hand, I trundled home and began working. Following all directions and being quite careful, I spent hours, days and months on that quilt. It was not even close to complete when Stephanie was born. Since I was fortunate enough to be able to stay at home with her, I had plenty of hours to work on it, and many months after she turned 1, it was complete.

It was an interesting quilt to make. The barn was done in sections. There was a rectangular piece with the horses in it; then another with the hen and chick, and yet another with the dogs and cats (just below the hen and chick). Then the sections were appliqued onto the backing, and the rooftop and rooster were added.

Freezer Paper Applique

I used freezer paper to create the animal shapes with the 1/4" seam allowance folded under.

The freezer paper is cut into the desired shape. Cut the paper so that the right side of the pattern is on the dull side of the wax paper.

The fabric is cut the same shape (right side facing up) with the 1/4" seam allowance added.

Then you place the dull side of the freezer paper against the wrong side of the fabric. Fold the seam allowance onto the shiny side of the wax paper and iron. The heat of the iron somewhat melts the wax on the freezer paper and causes the fabric to stick to it.

Place the piece down on the background fabric, right side facing up and the shiny side of the wax paper facing the background fabric, and iron it in place. Again, the wax will melt slightly and the piece will stay in place - although I still pin the piece as I applique.

After the piece is appliqued to the background, cut a slice in the background, or cut out the background the shape of the appliqued piece leaving a 1/4" seam allowance, and remove the paper.

Back to the Barn Quilt

The biggest challenge was the white gate. It was made of one piece with the triangles cut out of the center, then the seam allowances folded under. Trying to keep it straight and flat, well, I still remember it! And I'm glad it's done.

Once all of that was complete, the rest was easy, simple borders, then batting, backing and quilting. Whoa! Batting - I used polyester. Our town had only chain fabric stores, so I used what they carried. (Now I use only cotton, silk or wool.)

And the quilting. Of course, my stitches were quite large - I thought 1/8" was pretty good. And someone told me to wrap the final stitch about 3 times through the fabric then string a long tail of thread through the center of the quilt; not to use knots (it will make your quilt lumpy!). Talk about an old wives' tale. That was a mess. It didn't look very good, and after Stephanie slept under the quilt once, the final stitches started coming out. With time, they have become more secure (who knows why), but I never did that again. I love knots! Tucked inside the quilt.

I followed every direction very carefully and couldn't even imagine a day when I might be able to make a quilt without specific instructions, let alone design my own quilt.

In retrospect, it was a crazy project. But, I stuck with it, and the quilt is still together today. Stephanie was easy on it - she used it for sleeping under, not dragging around the house and yard, or to practice cutting with scissors (like her brother did on a quilt. But that's a story for another day.) It has faded, and some of the fabric has small holes in it from a dog or cat claw. I kept some scraps of fabric so I could repair the quilt. Interesting - the scraps didn't fade! Why did I ever think they would match?

The quilt has been washed many times. It's had almost everything normal happen to it. And with the exception of the small holes, the fabric has held up well. It may also have to do with the fact that some of the fabric was polyester, too. Way back then, I hadn't discovered the benefits of using 100% cotton (oh - maybe that's why the applique was so difficult, and the seam allowance kept popping out). On the other hand, maybe it's in better condition having been made using poly fabric.

Little did anyone know what was beginning in my life.


Happy Quilting!

Penny Halgren
www.How-to-Quilt.com
Inspiration and Education for Beginning Quilters

www.Rag-Quilt-Instructions.com
Fast, Fun and Funky Quilts

©2005, Penny Halgren
Penny is a quilter of more than 25 years who seeks to interest new quilters and provide them with the resources necessary to create beautiful quilts.

This article courtesy of http://www.How-to-Quilt.com.
You may freely reprint this article on your website or in your newsletter provided this courtesy notice and the author name and URL remain intact.

Friday, August 04, 2006

Quick Baby Quilts


Greetings, Quilters-

Baby quilts are quite fun to make, especially when you start with already-quilted fabric!

It seemed like all of my friends were having babies around the same time I was. Not really too much of a coincidence, since we were all about the same age, and got married about the same time.

So, with one baby myself, and having completed a couple of quilts already, I understood the pleasure of having a baby quilt, and also understood the meaning of using a baby quilt.

First, it is a truly amazing thing to think that someone loves you enough to spend hours and hours creating a special gift for a new baby. Especially knowing what babies do - throw up, pee, chew, and roll around. And they don't seem to care what they do it on or to.

That's where the understanding of how babies use a quilt helps determine the design. It also helps to know whether the mom will appreciate the quilt and use it carefully, or whether she will use it the same way as a blanket purchased at Walmart.

Of course, babies need blankets, and quilters love to make quilts. So why not make a quilt that a baby can use, throw up on, pee on, chew on, and roll around on?

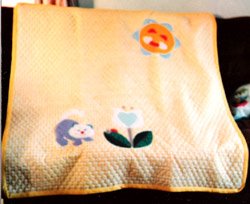
One of my dear friends was having a baby, and I wasn't sure about how she would use the quilt, so I scouted possibilities at the local fabric shop. I discovered fabrics that were already quilted. Solid fabrics in nice colors. So, I purchased a baby yellow quilted fabric, and found some big pictures to use as templates for an applique design on the quilt. I'm sure the options are much wider today.

This was a very simple design - a kitty sniffing a ladybug that was resting on a flower plant's leaf, and a sun up in the sky.

I pressed fusible interfacing to each of the pieces to make my sewing easier, and in a quick few hours, the project was complete.

Applique looks pretty easy, and it really is. Here are a few things to keep in mind that will make yours easy and look great once completed.

Plan your design carefully and cut out all of the fabric pieces before you start sewing. For the best finished design, your pieces should overlap each other. The first applique I made, I tried to have the pieces just meet. That was a huge mistake! They never match up exactly, and I ended up with frayed edges and a mess.

I iron a very light weight fusible interfacing to the back of my fabric pieces. Then I draw the pattern on the fabric and cut it out. You could use a double sided fusible interfacing. This will help keep the pieces in place as you sew. It may cause the finished quilt to be a little stiffer - something to check out.

Lay out the pieces on your background fabric as you want them in your finished design. Do not iron them in place at this time.

Lightly draw an outline of the finished design on your background fabric. This will serve as a guide as you are sewing the individual pieces.

Remove the pieces from the background fabric and place them in an independent resting place. This could be an ironing board, table, or pile in your sewing area. I like to have mine organized like they will be sewn, so it is easier for me to see what the next piece is.

Find the bottom-most piece. This will be the first piece you sew. In the quilt above, for the cat, the bottom-most piece was his tail.

Once found and placed on your background fabric, sew it on.

Tip #1 - this is where the outline on your background fabric will come in handy.

Tip #2 - I use thread that matches the fabric I am sewing on the top for my applique. The bobbin thread stays the same color, and matches the bottom fabric.

Tip #3 - I adjust the tension on my machine so that most of the top thread goes around to the back and the bobbin thread is almost a straight thread running throuh a tunnel of top thread.

Tip #4 - I use something stiff under my background fabric to allow the fabric to slide through the machine without getting guided by the feed dogs. Long ago, I used plain paper, and that still works. There is also a woven material, much like a non-fusible interfacing, that you can use. One piece that is the size of the whole design seems to work the best.

Identify the next lowest piece, and place it on top of the piece just sewn. Sew this piece in place. If this fabric is a different color from the previous one, you may wish to change your top thread.

Continue stacking and sewing until your design is finished.

If you have used paper on the back of your design, now is the time to rip it out.

You're done!

Once I had all of the design pieces sewn on and the paper ripped out, I put a quick binding on. This binding was a store-bought double wide bias binding, that was made for quilts. It is about 1" on each side - so it is really extra wide. I machine stitched the binding on the front, folded it over to the back, and then hand stitched it closed on the back. After all, I did want something about this baby quilt to be hand stitched.

My friend, Roberta, loved her new baby quilt, and her baby, Hilary enjoyed it as well. What's really fun about this quilt is that Roberta had never really thought about making quilts. With this gift and the passage of some time, she, too, decided to take up quilting. Now not only do we share stories of our kids, but we share stories of our quilts!

You just never know where your passion for quilting will take you and / or your friends.

Happy Quilting!
Penny Halgren
www.How-to-Quilt.com
Inspiration and Education for Beginning Quilters

www.Rag-Quilt-Instructions.com
Fast, Fun and Funky Quilts

©2006, Penny Halgren
Penny is a quilter of more than 24 years who seeks to interest new quilters and provide them with the resources they need to create beautiful quilts.

This article courtesy of http://www.How-to-Quilt.com.
You may freely reprint this article on your website or in your newsletter provided this courtesy notice and the author name and URL remain intact.